Build a Login/Signup using MERN Stack - Part 2 (Backend)

Hi all 😀 ! I am back with another article on Authentication with Mern Stack . In this blog , we will use bcryptjs for hashing password and JWT for token verification .
In case if you have not read the previous article , I would advice you to go through this .
So , in my previous article I guide you to how to save data to the database . Now , we will learn :
Password Hashing
JWT Authentication
Password Hashing
Why we need hashing ?
For any reason, your database may be compromised and its data may be obtained by someone else. If the passwords are in what we call plain text, you will have leaked a piece of sensitive information that your users have trusted you with: their password (which is very likely to be a password shared in multiple services). This is a very serious issue.
Instead of plain text, passwords are typically hashed with an one-way hashing function. If the cryptographic function used for the hashing is strong, then the passwords are much safer, because even if someone gets their hands on your database, it's computationally infeasible to calculate the passwords (given only the hashes).
On the other hand, the hashed information remains useful to you: Because the same hash function will always yield the same hash for the same input, you can still hash any attempted password and compare the result to your saved hash to verify a user's authentication attempt (without knowing the correct password beforehand).
Using bcrypt.js is a secured way to store passwords in my database regardless of whatever language my app’s backend is built in — PHP, Ruby, Python, Node.js, etc.
Install dependencies using command :
npm i bcryptjs
Require the package in our file where routes are defined . We will use bcrypt.hash() to create a new hashed password . It asynchronously generates a hash for the given string. For more info go to link .
bcrypt.hash(password,12)
The above code will create a hashed string . The default salt value is 10 . We can access the hashed password using .then() . Now , we just have to update the password to a new hashed password . The remaining code will come inside this then() .
const express=require('express');
const router=express.Router();
const mongoose=require("mongoose")
const User=mongoose.model("User")
const bcrypt=require('bcryptjs')


router.get('/signup',(req,res)=>{
    res.send("hello");
});

router.post('/signup',(req,res)=>{
    var {name,email,password}=req.body
    console.log(req.body)
    if(!email || !password || !name)
    {
        return res.status(200).json({error:"Add all data"})
    }
    bcrypt.hash(password,12)
    .then((hashedpw)=>{
        User.findOne({email:email})
        .then((savedUser)=>{
            if(savedUser){
                 return res.status(422).json({error:"User already exists with that email"})
            }
            const user=new User({
             email,
             password:hashedpw,
             name,
         })
         user.save()
         .then((user)=>{
             res.json({message:"Saved Successfully"})
             console.log(user.email)
         })
         .catch((err)=>{
             console.log(err)
         })
    })
    .catch((err)=>{
        console.log(err)
    })

})
.catch((err)=>{
    console.log(err)
})
})

module.exports=router
Now , if you create a post request from Postman , you will see a hashed password instead of a normal string just like this :

Congratulations , for hashing your password .
Creating Login route
Now, it's time to create a login route . Create a post route at '/login' just like we made for signup . We will post email and password to this route . Req.body will have the data . We will destructure it and get the access to that data .
Logic
First , we will check whether the user has input all the essential details , if not so then we will show error message .
After that , search for user that has the email specified . We can do this through MongoDB methods . We will use User.findOne() . Since , we are finding user with that particular email , we have to give the email as the parameter . FindOne finds a single user with that email . For more info look into this
We will use .then to access the user , if it doesn't exist we will showcase error .
If user exists then we will compare the password using bcrypt.compare(), this function returns a promise which when resolved gives a boolean value . It asynchronously compares the given data against the given hash. For more info go to link
If the boolean value is true , we will send login message otherwise error message .
router.post('/login',(req,res)=>{
    var {email,password}=req.body
    if(!email || !password )
    {
        return res.status(422).json({error:"Please add all fields"})
    }
    User.findOne({email:email})
    .then((savedUser)=>{
        if(!savedUser){
            return res.status(422).json({error:"Invalid Email or password"})
       }
        bcrypt.compare(password,savedUser.password)
        .then(match=>{
            if(match)
            {
                res.json({message:"Login Successfull"})
            }
            else{
                return res.status(422).json({error:"Invalid email or password"})
            }
        })
        .catch((err)=>{
            console.log(err)
        })
    })
})
Now, send a post request to '/login' , with all the details . You will see login message over there . Great 😀 ! You have learned to compare passwords and send a login message .
Sending tokens using JWT
A token is a piece of data that has no meaning or use on its own, but combined with the correct tokenization system, becomes a vital player in securing your application.
Token based authentication works by ensuring that each request to a server is accompanied by a signed token which the server verifies for authenticity and only then responds to the request.
When a server receives a JWT, it can guarantee the data it contains can be trusted because it’s signed by the source.
The idea is simple: you get a secret token from the service when you set up the API.
On the client side, you create the token (there are many libraries for this), using the secret token to sign it.
You pass it as part of the API request, and the server will know it’s that specific client because the request is signed with its unique identifier.
Once a user is logged in we will send response with a token . If a user has that token he/she will be able to access any protected resource . For more info go to link .
Let us install it first .
npm install jsonwebtoken
We will now require that package . Now , we will create a token using jwt object . We will sign that token using jwt.sign() . We also need to have a secret key to create a signed token . Go through this and this . In the keys file , create a jwt secret key just like :

Require that key , so that we can use it for signing token . The updated code of the login route would be :
router.post('/login',(req,res)=>{
    var {email,password}=req.body
    if(!email || !password )
    {
        return res.status(422).json({error:"Please add all fields"})
    }
    User.findOne({email:email})
    .then((savedUser)=>{
        if(!savedUser){
            return res.status(422).json({error:"Invalid Email or password"})
       }
        bcrypt.compare(password,savedUser.password)
        .then(match=>{
            if(match)
            {
                const token=jwt.sign({_id:savedUser._id},JWT_SECRET)
                res.json({token:token})
            }
            else{
                return res.status(422).json({error:"Invalid email or password"})
            }
        })
        .catch((err)=>{
            console.log(err)
        })
    })
})
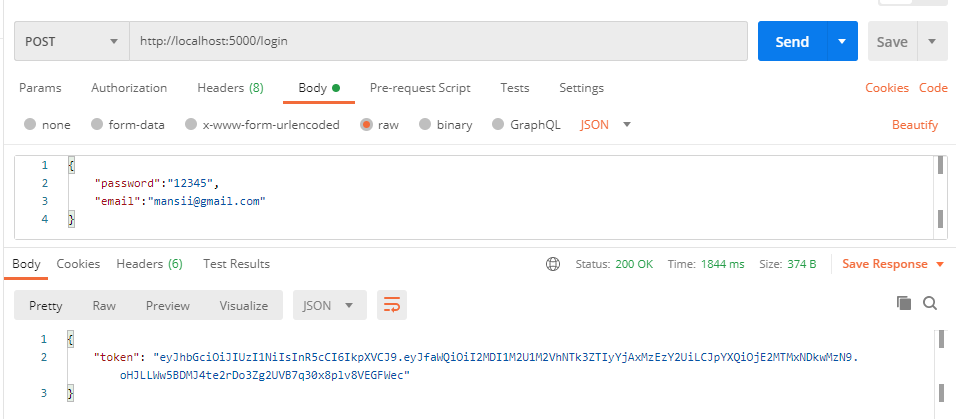
If the login details are correct , we will respond with a signed token . The token would be signed with the help of a secret key . Once you are done with code , send the request from postman . You will see token as a response .
Once the token is produced , we will use it for accessing protected routes . The token will be send to the server inside the request headers . An authorization header will be used for this purpose . We will use postman for now , to send this type of request . In later part , we will be using React to send the authorization header .
Bearer authentication (also called token authentication) is an HTTP authentication scheme that involves security tokens called bearer tokens. The name “Bearer authentication” can be understood as “give access to the bearer of this token.” The bearer token is a cryptic string, usually generated by the server in response to a login request. The client must send this token in the Authorization header when making requests to protected resources . Also see this .
The authorization string will look something like : "Bearer token" . We only need token , so in need to access that , we will replace bearer with space .
We will check for this authorization header and if it is present , we will verify that token using jwt.verify that takes parameter token , secret key and a callback function . The callback function returns a payload , which contains the id of the user . It returns id as payload because we used id of the user to sign the token .
Now , since we have the id of user we can use that to find the user and attach it to request.user . Now with every request from client , it will have req.user unless removed or cleared .
To do the above things , we must make another folder for middleware and a file inside it as login.js .
const jwt=require('jsonwebtoken');
const {JWT_SECRET}=require('../keys');
const mongoose=require('mongoose');
const User=mongoose.model("User");

module.exports=(req,res,next)=>{
    console.log(req.headers)
    const {authorization}=req.headers
    if(!authorization)
    {
        return res.status(401).json({error:"YOU MUST LOG IN"})
    }
    const token=authorization.replace("Bearer ","")
    console.log(token)
    jwt.verify(token,JWT_SECRET,(err,payload)=>{
        if(err){
            return res.status(401).json({error:"YOU MUST LOG IN"})
        }
        const {_id}=payload
        User.findById(_id).then(userdata=>{
            req.user=userdata
            next()
        })

    })
}
Now , let us make a route and name that '/protected' . It will only send the "Hello world" to browser . The only difference is that , it will have the middleware that we just made .
Middleware functions basically have an access to the request . Before executing the actual request it , first executes the middleware . Let us create a route and use middleware . Require the middleware in our auth.js file and write code like :
const login=require('../middleware/login')

router.get('/protected',login,(req,res)=>{
    res.send("hello");
});
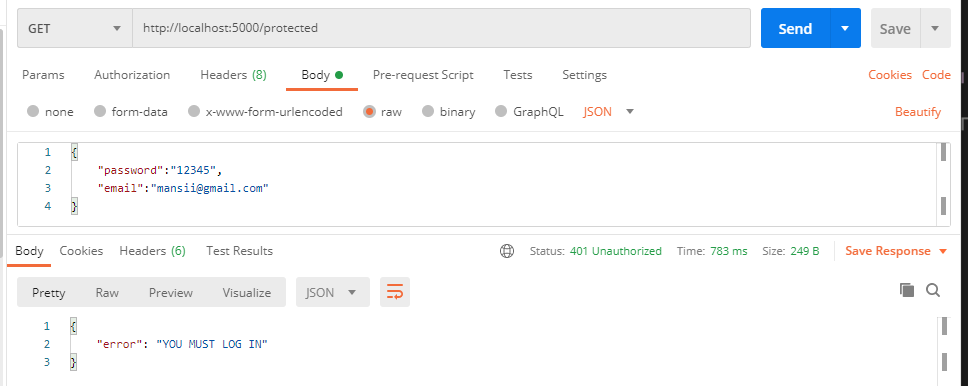
Now if you try to access this route without a token , you will see an error message like :
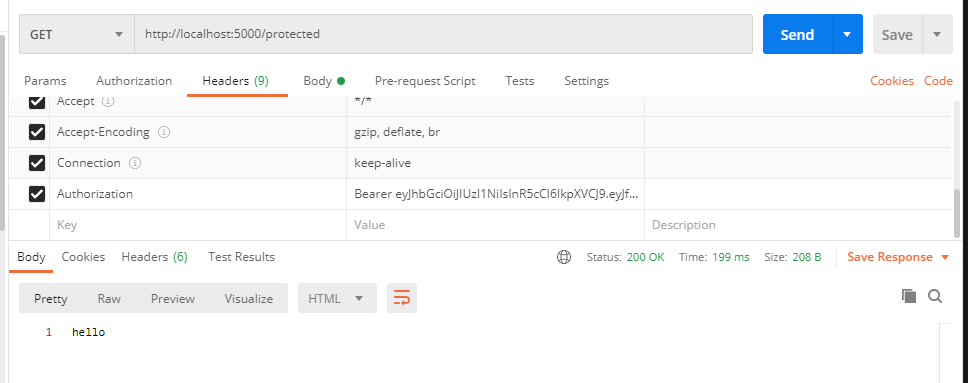
Now let us go to login route and get the token . Once we get the token we will add an authorization header in our postman just like this :
That's it ! You have successfully learned to use tokens and hashing . 😀
In my next blog , i will try to create a frontend part for this .

